
19-08-2023
10:03
Our team sorts through all blog submissions to place them in the categories they fit the most - meaning it's never been simpler to gain advice and new knowledge for topics most important for you. This is why we have created this straight-forward guide to help you navigate our system.
And there you have it! Now your collection of blogs are catered to your chosen topics and are ready for you to explore. Plus, if you frequently return to the same categories you can bookmark your current URL and we will save your choices on return. Happy Reading!
Chrome Music Lab- Andrew Keegan shares 5 lesson ideas to try to save you time.
Chrome Music Lab is one of my absolute favourite ‘go-to’ digital music making resources at the moment, and for very good reason. Although the ‘experiments’ are simple in their execution, what you can do with them is far more than that. Below are 5 lesson ideas you can have a go at, using Chrome Music Lab as your starting point.
In no particular order, let’s get started!
1) Complete the pattern
This is a fairly easy activity to do, but you can make it so hard if you want to! Go ahead and open up Song Maker and you’ll be met with a blank screen like this:

Once you’ve opened it up, you can create a simple pattern in the first bar and ask your class to then copy and repeat the pattern on their own devices. If you’re stuck for ideas, try using this one (click here to open it directly on your device, too!):
And that’s it! OK, that’s not quite all there is to it, but that’s your starting point. To extend the task, your class could pair up, with one person creating the first bar and the second person trying to copy the pattern into the remaining three bars. Something else I’ve done in the past is to print out a screenshot of the blank starting screen, asked the class to create their patterns, or compositions, by hand, and then fill them in on Song Maker.
Apart from being a fun activity for music, this is also a great opportunity to talk about repeating patterns in terms of maths and art. You could also add limitations to how they create their patterns, e.g. “You can only use a quarter of the percussion notes” which will really get them thinking!
2) The beauty of symmetry
Similar to ‘complete the pattern’, start off with a blank screen in Song Maker, but this time create a pattern or image that fills the first two bars, like this (or click here):

Once they have the first two bars copied, treat the end of bar two as a mirror line and get the class to reflect the shape, creating a symmetrical image. They will have lots of fun creating their own images, again working independently or with a partner whilst developing digital artistic and mathematical skills. If you want to make this a little easier, go to settings and change the length to 2 bars.

This will allow pupils to work with one reflected bar, instead of 2. Again, you could print out blank workspaces and get the class to reflect the patterns by hand before copying them into their digital documents.
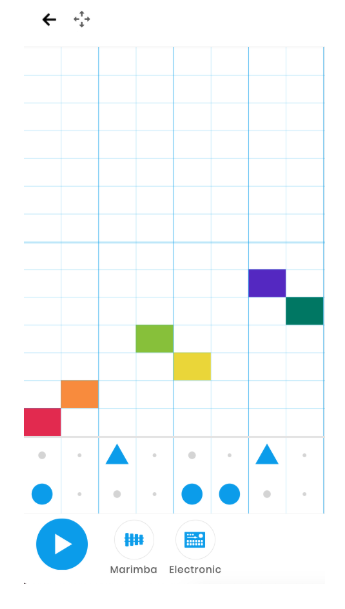
3) What can you spell?
This is an old music lesson favourite, and it is based on the principal of using musical notation to spell words. Before working on Music Lab, as a starter, ask your class to spell as many words as possible using only the letters A, B, C, D, E, F & G. They can use letters more than once if they wish. You could make this a competition, who can spell the most words? Who can find the longest word? (I won’t spoil this for you, give it a go yourselves!) Once you have your word bank, you can head over to Melody Maker to get started.
Using the colour scheme here to match the letters used, get the class to input their spelling to see what they sound like!

Once the class are confident using this method of note input, you could transfer the skill over to Song Maker, and create longer compositions using different words. You could even get the class to input several different words in layers and begin creating some interesting harmonies and counter melodies!
If you wanted to bring this work into the physical world, the colours of the notes match colour systems for classroom musical instruments, so you could have some digital music playing in Melody Maker or Song Maker, whilst the class play other words using their own acoustic instruments. You may even like to write a short story using the words the class composed, and play the words in time with the story too!
4) An artists delight
This activity is great for younger classes, but it can be developed for older children too. To begin with, ask the children to draw any of the following shapes on either a sheet of paper, in their books or on a personal whiteboard:
Lines, Circles, Squares/Rectangles (quadrilaterals) or Triangles.
The shapes can be as big, small or as numerous as they like. They might even only want to use one shape! Once they have created their images, introduce them to Kandisky. Kandinsky is a beautifully simple ‘experiment’, because all the children have to do is draw! Ask the class to copy their original pictures into Kandinsky, then hit play.

What do they notice about the different sounds produced? Do the shapes all make the same sound? What is the difference between larger shapes? What happens when you draw shapes higher or lower on the screen?
Ask the class to change the colour scheme and see what they think now! You could then look into the life and work of Kandinsky, and use your compositions as examples of work inspired by him.
5) Give me a beat
This is a really simple activity which brings the digital world into the acoustic one. Start by opening up Rhythm. Once it’s open, press the right arrow until you have these two critters on your screen:

Once they’re up, create your own rhythm for them to play. You could start with something simple, like this:

This creates your beat which your class are now going to play along with using their own instruments. Rhythm is a fantastic ‘experiment’ for simply creating a backing beat, or metronome, for your pupils to play along with. They could clap or march in time, or they could compose their own ostinato (repeating musical pattern) on their own instruments to play.
You could split the class into three groups, each group playing or clapping one of the lines of the rhythm, such as this:

They will find this really challenging at first, but in time will help develop a greater sense of pulse and ability to perform different parts alongside classmates.
If you wanted to look at the mathematical aspect of this ‘experiment’ you could look at how many of each beat you’ve used, then transfer this to fractions. You could even ask the pupils to create rhythms which only use set amount of each beat. For example, “You MUST use half of the orange beats, three eighths of the blue and all of the yellow notes.”
Hints and Tips
1) Most of the ‘experiments’ are there to demonstrate very small areas of music and sound creation. This means that saving your work is not possible all of the time. However, as you can see, screenshots can be taken to share work that has been done.
2) In Song Maker, when you click on “save” you will be given more saving options. If pupils work digitally, they can save the link to their own digital portfolios. You could even use the link to create a QR code and display the work around school for others to experience.
3) I would highly recommend investing in a portable speaker to help share work with the rest of the class. I picked up a cheap bluetooth speaker from a supermarket for £20 and connected it with an AUX lead to share work – perfect!
4) If you’re feeling REALLY adventurous, you can buy a 4 way headphone splitter online and try connecting 4 different devices to the same speaker! This is really challenging, but allows you to mix and match ‘experiments’ and create some fantastic music.
As with everything I write, I don’t expect you to do exactly as I say. In fact, I fully expect you to take these ideas and bend, twist and develop them into your own resource to meet the needs of the pupils you have in front of you day in, day out. I hope you find some of these ideas useful, and I’d love to see what you and your classes get up to using Chrome Music Lab. If you feel like sharing your work, you can find me over on Twitter @andykeegan – I look forward to seeing how you get on, and don’t forget to use the hashtag #chromemusiclab to let the Chrome team what you’re up to as well!
You must be logged in to post a comment.


Are you looking for solutions? Let us help fund them! Nexus Education is a community of over 11,000 schools that come together to share best pract... View More
Established in 2011, One Education is a company at the heart of the education world, supporting over 600 schools and academies. Our unique appeal a... View More
School Space is a social enterprise that has empowered schools for over 14 years through their profitable and hassle-free lettings services. So far... View More
Unify is an online sales and marketing tool that allows users to create tailored personalised documents in moments. View More
There’s nothing special about the energy we sell. In fact, it’s exactly the same energy as all our competitors provide. But there is something spec... View More
Securus provide market-leading monitoring solutions to safeguard students on ALL devices both online and offline. We also offer a full monitoring s... View More
Robotical makes Marty the Robot - a walking, dancing coding robot that makes programming fun and engaging for learners as young as 5. Our robots co... View More


Excellent Ideas! Will definitely be trying these in class 🙂